Saturday, February 24, 2007

Candles flaming brightly

Not long ago, I bought a couple of cones of 100% silk 2/28 lace weight yarn from ColourMart's new website. The price was particularly good at the time ($US12 per 150 g cone, including shipping anywhere in the world) as Richard was testing out the new website and was keen for people to test it out. The colour of the yarn turned out to be a bit less red and quite a bit more pink than I'd originally hoped it would be when it arrived on my doorstep -- one of the joys of buying yarn like this over the internet ;) -- but it was a really fabulous colour anyway, so I went searching for a project that would bring out its best.

And then Knitabulous, temptress that she is, posted about the 'Candle Flame Shawl' she has been working on using Debbie Bliss 'Pure Silk' and I was sold.

Now, Knitabulous can't be expected to take any of the blame for what follows, as it's really not everyone who would look at the work in progress photos of her lovely shawl, read about her safe, slow, languid knit which gets worked on when there is a need to meditate, and then immediately leap to the conclusion that a pattern originally designed to be knit with Lambs Pride Bulky yarn on US 10 knitting needles would be just perfect for some 2/28 lace weight silk yarn. That requires a very special way of thinking that most people would quite rightly refer to as madness.

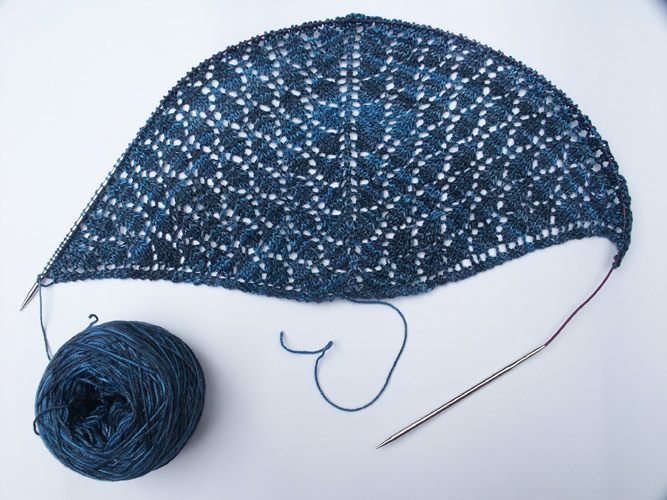
So, out came the two cones of lace weight silk yarn, my 2 mm Addi circular needles, and the pattern for the aforementioned Candle Flame Shawl, and not too long afterwards I had produced this...


Just in case it's not obvious from the photos, I'm knitting with two threads of the yarn held together...


... which is producing just the right fabric density on the 2 mm needles.

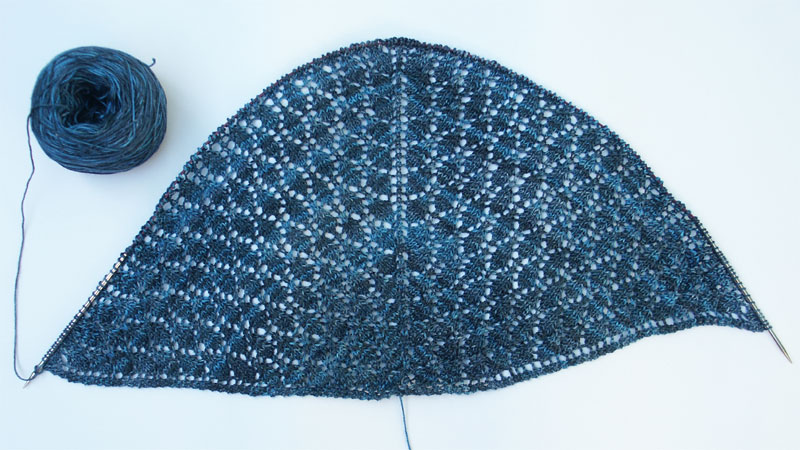
And after a few more days work, my shawl looked like this...


... and I can definitely say that the cone spindles were one of my better knitting accessory purchases, as they are making it really easy to knit the yarn straight off the two separate cones.

To show some of the stitch detail better, here is a close up photo of the front of the shawl...


And of the back of the shawl...


Even though it isn't strictly speaking reversible, I think the reverse side of the candle flame stitch pattern used in this shawl is actually quite attractive too.

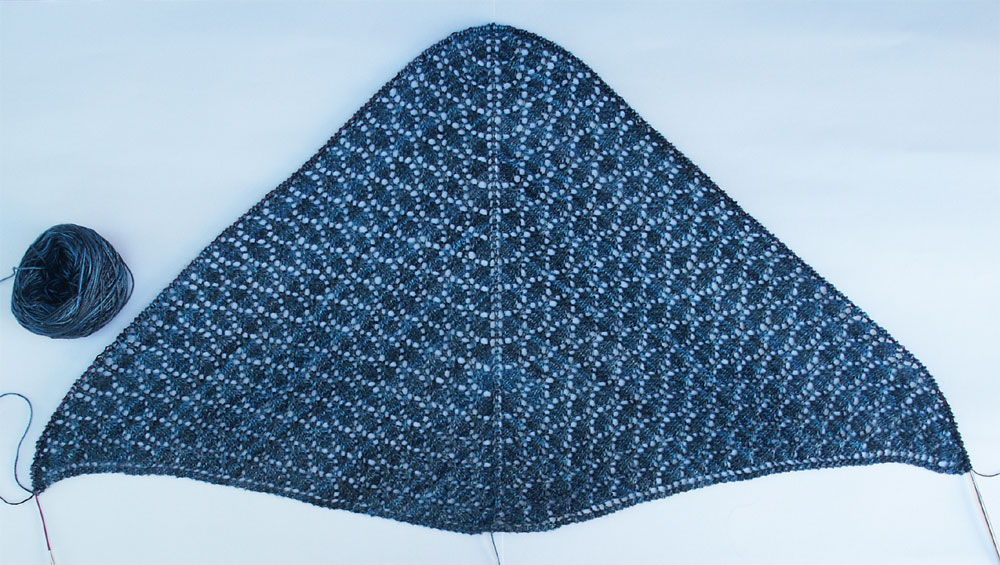
After quite a bit more work, my shawl had grown considerably.

Here is the front view...


And the back view...


It's entirely possible that this shawl is another one of the distractions which has kept me from posting to this blog over the past few weeks. ;)

At the point shown in the last two photographs, I estimated that I'd knit about 25% of the final shawl, and the rows were already 433 stitches long, which means there will probably be double that number of stitches on the needles by the time the shawl is finished. Eek!

I still have to decide upon the edging to use along the top edge of my shawl, as I really don't think the original 10 stitch garter stitch border is going to work well for this much lighter weight version of the shawl.

I've actually done a couple more pattern repeats over the past few days and there are now 467 little, tiny stitches sitting on my needles.

And I definitely need to wear my glasses when I'm working on this project. ;)

I'm really enjoying working with this yarn, and I'm so impressed with the way the knitted fabric is turning out -- it has a fabulous drape, and is as silky soft as lingerie fabric -- that I've gone ahead and bought some more of it for future projects. At $US16 for a 150 g cone with 2,300 yards of yarn on it, and with such stunning colours currently available, it really was impossible to resist. :)

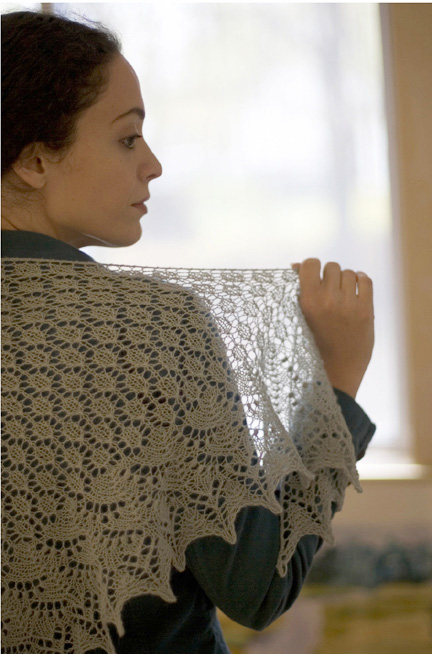
And just in case anyone is wondering what has happened to my 'Swallowtail Shawl', it is now off the needles but is still waiting for me to clear enough space somewhere in the house so it can be blocked...


And yes, those black threads visible in the photograph are the life lines still in place -- I'm a bit of a wuss when it comes to removing safety nets. ;)

For anyone who has been keeping track -- The last row before the shawl was cast off was 503 stitches long, and I had around 17 g of the 'Sea Silk' left by the time I finished. Unblocked, the shawl is approximately 74 cm long measured down the centre spine, and 152 cm wide measured across the whole top edge. I'm feeling quite confident now that it will block out quite nicely to the size I've been dreaming of.

I actually knit the final row and the cast off of my 'Swallowtail Shawl' after I had started work on the 'Candle Flame Shawl', and was surprised at how much like logs the 4 mm needles felt after the 2 mm needles, even though I'd only been working with them for a very short time at that stage.

There has also been some re-stocking at Purl Yarns, which prompted me to buy these...


Two hanks of Lorna's Laces 'Shepherd Sock' in the 'Lakeview' colourway, and two hanks in 'Blackberry', both of which I have been looking out for for a while now.

I also took the opportunity to order some balls of Kaalund 'Enchanté' in the 'Wisteria' colourway for myself when I placed the telephone order for Lois' yarn at Kaalund.


This is another of those colourways that my digital camera doesn't appear to be able to do full justice to, but I hope the photo gives at least some idea of what the yarn looks like in person.

While I was putting together Lois' final Secret Pal 9 package, I paid a visit to The Wool Inn at Penrith.


While I was there, I found some balls of Kaalund 'ClassicTwo' in the 'Tropical Berries' colourway, which I have earmarked to be used for knitting one of the shawls featured in Issue 2 of Yarn magazine. I was also shown some Mi Inca 100% Baby Alpaca yarn in a fabulous teal colour, which insisted on following me home down the motorway. And of course I had to buy a couple of the Colonial rosewood circular needles (a 4.5 mm and a 5 mm, both in the 24" length) to try out for myself too.

Just in case it isn't obvious already, I don't believe in the whole yarn diet thing which appears to be so popular at the moment. Call me crazy, but I'd actually like for there still to be some yarn stores around by this time next year. ;)

Labels: , , ,

Tuesday, January 16, 2007

Swallowtail Shawl -- much enlarged and almost complete

Elly asked me a few weeks ago what I'd decided to do with my 'Swallowtail Shawl'. Well, at the time she asked the truth was that I still wasn't entirely sure what I was going to do, which is why I'd already started to put in lifelines at strategic points.

The good news is that things have progressed since then, and my Swallowtail Shawl is now almost complete. :)

So... What did I decide to do in order to turn the original scarf-sized shawl into the huge, wrap myself in 'Sea Silk' shawl I was sure was hiding inside the original pattern, just waiting to be set free?

Firstly... As I wanted a shawl which would appear to have a similar stitch density to that of the original shawl when it is blocked -- I definitely didn't want an ethereal, barely there version of it knit on huge needles -- I decided I would knit my shawl on 4.00 mm needles (I actually used my US 6 KnitPicks Options circular needles) and would work on it with the idea that the finished shawl would require around two hanks of the 'Sea Silk' yarn (a total of 200g and 800m), which is double the amount of yarn the original shawl required.

As I mentioned in my earlier posting, I did the calculations and discovered that if the 'Budding Lace' section of the shawl is made bigger by working multiples of 5 extra repeats of the 'Budding Lace 2' chart (30 rows), then the stitch count will still work perfectly for the start of the 'Lily of the Valley Border 1' chart. At that time, I had just finished 19 repeats of the 'Budding Lace 2' chart (5 more repeats than are required in the pattern), and had threaded a lifeline through the stitches at that point as it still didn't look to me like the finished shawl would be quite big enough and I wanted to see how another 5 repeats of the 'Budding Lace 2' chart would look. (255 stitches)

After I completed those 5 extra repeats (24 repeats of the 'Budding Lace 2' chart in total), I was a lot happier with the way things were looking for the finished shawl, so I threaded a second lifeline through at that point and moved on to the 'Lily of the Valley Border' at last. (315 stitches)

More decisions needed to be made at this point.

I decided that I would work 3 of the 'Lily of the Valley Border' 10 row blocks.

There were a few reasons for this decision. Despite the fact that my calculations showed that working 4 blocks would have made the stitch count exactly right for the start of the 'Peaked Edging' chart, I felt that 4 blocks would have made the 'Lily of the Valley Border' too wide for the rest of the shawl, and that it would also have resulted in the shawl using more than two hanks of 'Sea Silk'. Aside from that, aesthetically I thought 3 blocks would look good, and superstitiously I don't like building the number 4 unnecessarily into the things I knit. So 3 blocks of the 'Lily of the Valley Border' it was, and I left the problem of finding the extra 4 stitches I'd need to start work on the 'Peaked Edging' chart as something to be dealt with later.

Speaking of aesthetics... I realized at this point that the 'Lily of the Valley Border 1' chart would not provide as attractive a lead in at the centre spine of the shawl to the 'Peaked Edging' as the 'Lily of the Valley Border 2' chart did in the original shawl. So instead of just working Rows 3-12 of the 'Lily of the Valley Border 1' chart a second time after the completion of the 'Lily of the Valley Border 2' chart as I'd originally planned, I decided to do this instead...

Work Rows 1-2 of the 'Lily of the Valley Border 1' chart.

Work the 'Lily of the Valley Border 2' chart.

Work Rows 3-12 of the 'Lily of the Valley Border 1' chart.

Work the 'Lily of the Valley Border 2' chart a second time.

Despite its cobbled together appearance, I did do all the maths and had proved to myself that everything would still line up perfectly with the border worked this way before I started work on the 'Lily of the Valley Border'. :)

For what it's worth, I finally had to join in the second hank of yarn at the start of Row 2 of the 'Lily of the Valley Border 1' chart.

Apologies in advance for the next two photographs -- it turns out that not everything photographs well using my really weathered, just about to fall apart, 20+ years old, jarrah wood table as a background after all ;) -- if you click on the photos though, things should be a little clearer at least in the larger versions of the photographs.


And here is a close up of the centre edge of the shawl...


I think this photo is just good enough to be able to make out the first few nupps of the 'Lily of the Valley Border' -- my very first nupps! :) The black threads are the lifelines, by the way.

The next three photographs were taken using a couple of sheets of white cardboard I found lying around the house as a background. The shawl is a little cramped on them -- which is why I'd originally chosen to take the previous two photographs using my weathered, outdoor table as a background -- and none of the cables available for my KnitPicks 'Options' circular needles were long enough at this point to spread the shawl out to its full glory anyway, but at least the stitch patterns are showing up clearer here than they did in those previous two photographs.

At the time these three photographs were taken, I'd just started on the final repeat of the 'Lily of the Valley Border 2' chart...


Zooming in closer to reveal a bit more detail...


And closer still...


Once I had finished working the final block of the 'Lily of the Valley Border', I threaded a third lifeline through the stitches of the shawl as I knew I'd be doing quite a lot of experimentation on the next section. (379 stitches)

As I said earlier, I really needed to make a decision at this point as to where the extra 4 stitches I would need to work the 'Peaked Edging' chart would come from.

My original thought was that it might be possible to gain those additional 4 stitches by adding an extra 2 rows to the 'Peaked Edging' itself between the essentially pattern-free original Rows 1-2 of the chart and where the actual lace pattern starts in Row 3.

The first thing I tried was this...


... which basically just completes the second arch over the scallops of the edging, and seemed like it would be the least intrusive thing to try. The reality, though, was that it created very obvious triangles of knitted fabric above where the points of the scallops would eventually be, which were made all the more stark by the sloped stitches which bounded their lower edges.

In an attempt to break up the appearance of these triangles, I unravelled the shawl back to my lifeline and gave this a try...


While this did indeed break up the appearance of triangles, it also had the undesirable side effect of producing too solid a row of holes, which made a very obvious break between the 'Lily of the Valley Border' and the 'Peaked Edging', and in my opinion really disturbed the way the stitch patterns all work together in the shawl.

So... I unravelled the shawl back to my lifeline once again. As a final attempt, and to satisfy myself that I really had exhausted all the obvious possibilities here, I gave this a try...


Although this was probably the best of the three -- certainly, I worked more rows of the edging for this one than I did for the other two before I finally abandoned it -- I really didn't think it looked as good against the rest of the shawl as the original edging did.

So I unravelled my shawl back to the lifeline one last time, and finally gave up on this idea.

Even though I worked them on rows that were around 400 stitches long at the time, I don't regret for a moment spending the time trying out these three possibilities on my actual shawl rather than on a small swatch. Seeing them against the whole shawl really made it clear to me that even though there was nothing wrong with any of them as strategies for leading into the edging and getting the stitch count to the right number to work the remaining rows of the edging, they just weren't going to suit the finished shawl as well as the original edging on its own would.

(For anyone who is wondering... I didn't take any photographs of these three versions of the edging as basically I ripped them back to the lifeline as soon as it became clear to me that each of them wasn't going to give me an edging that would look the way I wanted it to -- the rows were around 400 stitches long by then, after all -- and I really didn't think photographs of the edgings at the points I abandoned them at would useful enough to be worth waiting around for the lighting conditions to be suitable to take them.)

So I finally arrived at the conclusion that the best course of action would be to work the 4 increases into the first row of the edging using the best strategy I could come up with to make them as invisible as possible.

It was reasonably obvious to me that I should spread the 4 increases out as evenly as possible over the row, so I decided to work 2 increases on each wing of the shawl, with the increases being worked so they occurred approximately one third and two thirds of the way along each of the wings.

I eventually decided that a 'Lifted Increase' worked to line up with and slope sympathetically with a decrease ridge in the 'Lily of the Valley Border' would stand the best chance of blending in with the rest of the shawl -- I was particularly concerned that many of the methods for increasing stitches would result in either an obvious hole or a stitch with a different appearance to those surrounding it, which would only be emphasized further by the stretching of the stitches which would occur once the shawl was blocked.

I was actually very pleased with how the increases turned out when I worked them this way, so I continued on with the remaining rows of the 'Peaked Edging' chart.

So here I am at last, with the 'Peaked Edging' chart completed and just the final few rows to work to finish off my shawl. (403 stitches) I currently have just 24g of my original two hanks of yarn left, so it looks like deciding not to work an extra 10 rows of the 'Lily of the Valley Border' was the right decision.

As my shawl is now too large to photographed in any meaningful way using the two sheets of white cardboard as a background, I've experimented this time with spreading a few light coloured towels over my jarrah wood table, which appears to have at least given me a background with enough contrast so some of the details of the shawl can be seen...


And here is a close-up photograph of the edging, to show the stitch details a little better...


For some unknown reason, the nupps I spent so much time working on aren't showing up in these photos anywhere near as well as they are in real life even with the shawl in its unblocked state. I have my fingers crossed that when I'm finally able to take a photograph of my completed and blocked 'Swallowtail Shawl', those nupps will practically leap off the screen. ;)

I haven't included a close up photograph of the increases I worked to make the stitch count correct for the 'Peaked Edging' chart in this posting as they're currently being obscured by the lifeline I ran through the shawl at the end of the 'Lily of the Valley Border', but I'll try to remember to take one when the shawl has been completed and blocked.

Labels:

Tuesday, November 14, 2006

And, believe it or not, I've been doing some actual knitting too!

In a previous posting, I mentioned that I'd have to find myself a new project for summer, as almost all of my current projects have significant mohair content and are impossible to work on when the weather is humid. Well, the lure of the Hand Maiden 'Sea Silk' combined with Evelyn Clark's 'Swallowtail Shawl' from the 'Interweave Knits' Fall 2006 issue has proved impossible to resist. How I wish I could say that this combination was all my idea, but there are already several completed Sea Silk 'Swallowtail Shawls' out there, and even the choice of the 'Ocean' colourway isn't original. Well, it just happens to be what I have here, and I'm going to go with it as I love the colourway.

So here it is after 9 repeats of the 'Budding Lace 2' chart...


While this may look like the point I was up to when I left the last get together at 'Rubi & Lana', it's actually 'Swallowtail Shawl' Mark II, as I decided the next day that I'd like to go up a needle size to US 6 (4.00 mm) needles, so I frogged what I'd knit up to that point.

And here it is after 13 repeats...


And after 19 repeats...


... which is the point I'm stalled at now. Before I proceed, I have to make a decision, and as you can probably see I've threaded a lifeline through the current row as I'm not sure I trust myself to make the right decision.

The original 'Swallowtail Shawl' is actually more of a scarf than a shawl...


... but what I want is a shawl you can really wrap yourself up in -- I'm knitting it in 'Sea Silk' after all, and I think that's something I'm really going to want to be wrapped in. ;)

I've done the calculations, and to enlarge the shawl and still keep all the patterns correct, you need to work 5 extra repeats of the 'Budding Lace 2' chart (19 repeats in total) and one extra repeat of rows 3 to 12 of the 'Lily of the Valley Border 1' chart after completing the 'Lily of the Valley Border 2' chart (3 'Lily of the Valley Border' repeats in total).

However, now that I've completed the 19 repeats of the 'Budding Lace 2' chart, I'm not entirely convinced that even with the extra rows of the 'Lily of the Valley Border' and the 'Peaked Edging', plus a really good blocking of course, that the shawl is going to attain the dimensions I'm dreaming of. I'm actually tempted to work a further 5 repeats of the 'Budding Lace 2' chart (24 repeats in total) along with an extra repeat of the 'Lily of the Valley Border 2' chart just before working the 'Peaked Edging' chart (4 'Lily of the Valley Border' repeats in total).

So... What do people think? Would I be crazy to do this? Am I under-estimating how much the shawl will increase in size once I work the extra edging rows and block it? Do I even have enough floor space to block the shawl properly once I finish knitting it if I make it this big? ;) The overall smallness of the original shawl really does have me worried though.

Before I move on to talking about the other project I've been working on, I should mention that this is the project I've decided to use to try out my new KnitPicks 'Options' needles. So far, I've been very impressed. I've only had the needles start to unscrew once, and that was because I really hadn't tightened them enough in the first place, and it hasn't happened again since I've made sure to really tightened them properly. The finish on the needle tips I have tried so far (US 5 and US 6) has been every bit as good, if not better, than the finish on my Addi Turbo circular needles, and the needles have had a really nice feel to them as I knit my 'Swallowtail Shawl' with them.

I chose this project to try them out as I'm using a yarn with little or no give to it, and it's a lace project. So far the sharper points of the KnitPicks needles are making this project a much more enjoyable knit than the 'Lace Modular Shawl' I knit a year ago using Artyarns 'Regal Silk' on Addi Turbo needles was. It's even a lot easier to unknit the centred double decreases when I make a mistake, thanks to the points of these needles. Sliding the stitches from the cable to the working area of the needle is also a lot easier than it was for similar sizes of Tulip bamboo circular needles -- which was the reason I was prompted recently to switch to using straight needles for my 'Pacific Ocean Stole', as moving the stitches from the cable to the needle was a major undertaking at the start of each row. As for the cables themselves -- I've tried a few of them out now as I've changed the cables to a longer one a couple of times now. Over all, they've been really nice -- they uncoil without even having to run them through hot water -- and the only problem I've had so far was that one of the cables had some residue on it which needed to be removed to enable the stitches to slide without snagging.

So far, I'd have to say that I'm really happy with this purchase. :) It's been so much better than my experience with the 'Denise Interchangeable Knitting Needles' has been to date.

Which leads me quite neatly to my 'Pacific Ocean Stole'...


... which as you can see has been progressing, albeit quite slowly -- I work on it when the weather permits. I've now completed the 10th pattern repeat, which I think will turn out to be somewhere around the halfway point.

Labels: ,